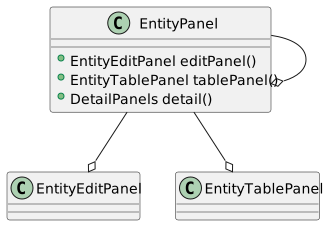
The EntityPanel is the base UI class for working with entity instances. It usually consists of an EntityTablePanel, an EntityEditPanel, and a set of detail panels representing the entities having a master/detail relationship with the underlying entity.
1. Basics
You can either extend the EntityPanel class or instantiate one directly, depending on your needs.
public class AddressPanel extends EntityPanel {

  public AddressPanel(SwingEntityModel addressModel) {
    super(addressModel, new AddressEditPanel(addressModel.editModel()));
  }
}
SwingEntityModel addressModel =
new SwingEntityModel(Address.TYPE, connectionProvider);
EntityPanel addressPanel =
new EntityPanel(addressModel,
new AddressEditPanel(addressModel.editModel()));2. Detail panels
Adding a detail panel is done with a single method call, but note that the underlying EntityModel must contain the corresponding detail model, see detail models. The detail panel hierarchy typically mirrors the model hierarchy — here the customer panel adds an invoice panel, whose model is the customer model’s detail model:
public final class CustomerPanel extends EntityPanel {

  public CustomerPanel(CustomerModel customerModel) {
    super(customerModel,
            new CustomerEditPanel(customerModel.editModel()),
            new CustomerTablePanel(customerModel.tableModel()));

    detail().add(new InvoicePanel(customerModel.detail().get(Invoice.TYPE)));
  }
}
A detail panel is just an EntityPanel — extended or instantiated directly:
public final class AlbumPanel extends EntityPanel {

  public AlbumPanel(AlbumModel albumModel) {
    super(albumModel,
            new AlbumEditPanel(albumModel.editModel()),
            new AlbumTablePanel(albumModel.tableModel()));
    SwingEntityModel trackModel = albumModel.detail().get(Track.TYPE);
    EntityPanel trackPanel = new EntityPanel(trackModel,
            new TrackEditPanel((TrackEditModel) trackModel.editModel(), trackModel.tableModel().selection()),
            new TrackTablePanel((TrackTableModel) trackModel.tableModel()));

    detail().add(trackPanel);
  }
}
2.1. Detail panel layout
By default, detail panels are laid out by a TabbedDetailLayout: the master panel and its detail panels share a split pane, with the detail panels in a tabbed pane on the right. A detail panel can be expanded, collapsed or torn out into a separate window, with both the mouse and the keyboard (see navigation below).
The layout is configurable per panel — the invoice panel below opts out entirely, since its invoice line panel is embedded in the edit panel itself, while still registering the panel for keyboard navigation:
public final class InvoicePanel extends EntityPanel {

  public InvoicePanel(SwingEntityModel invoiceModel) {
    super(invoiceModel,
            new InvoiceEditPanel(invoiceModel.editModel(),
                    invoiceModel.detail().get(InvoiceLine.TYPE)),
            new InvoiceTablePanel(invoiceModel.tableModel()),
            // The InvoiceLine panel is embedded in InvoiceEditPanel,
            // so this panel doesn't need a detail panel layout.
            config -> config.detailLayout(DetailLayout.NONE));
    InvoiceEditPanel editPanel = (InvoiceEditPanel) editPanel();
    // We still add the InvoiceLine panel as a detail panel for keyboard navigation
    detail().add(editPanel.invoiceLinePanel());
  }
}
3. Edit panel state
The edit panel can be embedded (the default, above the table), displayed in a separate window, or hidden, toggled via the toolbar or CTRL-ALT-E. The available states — and whether the toggle uses a frame or a dialog — are configurable via the panel’s Config.
4. Navigation and resizing
Entity panels form a keyboard-navigable hierarchy: CTRL-ALT-UP/DOWN moves between master and detail panels, CTRL-ALT-LEFT/RIGHT between sibling panels — with focus following, so the active panel is always the one under the keyboard. SHIFT-ALT-LEFT/RIGHT resizes a master/detail split, and CTRL-SHIFT-ALT-LEFT/RIGHT expands or collapses it. Within a panel, CTRL-E transfers focus to the edit panel, CTRL-T to the table, CTRL-I to the initial input field, CTRL-F to the table search field.
The complete, current shortcut reference is available in any running application via the Help menu (Keyboard shortcuts).